Friday 24 December 2021

Happy Christmas Eve

 Hello and Happy Christmas Eve!

I'm sharing the last of my cards from the November show on the Craft Store for Chocolate Baroque.

These cards all use stamps from Frosty Trees set.


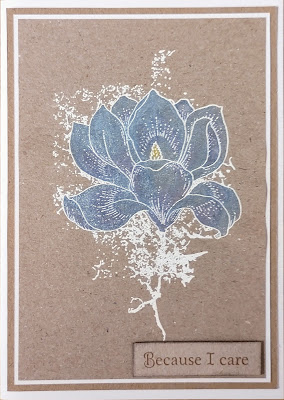
For my first card I made a background using Distress Inks and a stencil. I blended the inks off the stencil onto the card each time using a darker colour and not quite covering the previous colour ink. I also blended some ink for the sky which I spritzed with water and blotted to make it look snowy. I stamped the swirly tree in Versamark and embossed in silver. I stamped some background trees from Trees a Crowd using my background colours. I stamped a sentiment onto a die cut. I mat and layered my piece onto a 8x8 card base.


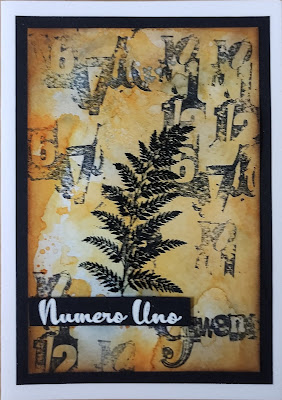
For my next card I used Brushos on a piece of  water colour card. When it was dry I stamped the trees with Versamark and embossed in white. I trimmed the image and layered onto a 7x5 card base. I added a sentiment from the stamp set.


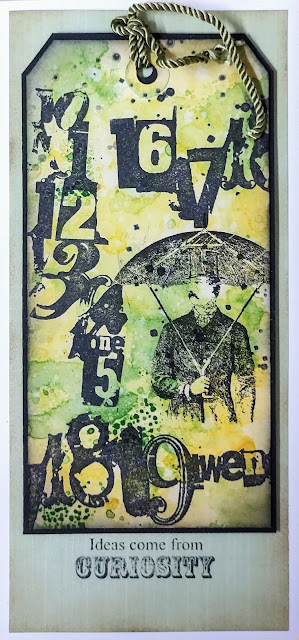
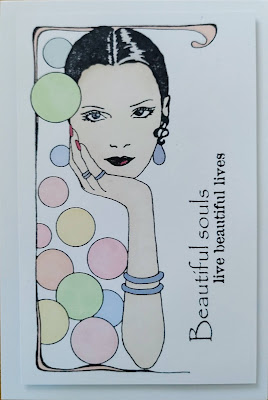
For my last card I made an aperture easel card. I stamped "snow" using the splatter stamp from Numerology. I stamped the Swirly tree onto a piece of vellum and embossed in white. I added a sentiment as a stopper. The second picture shows it lit up.


I hope you all have a happy and healthy Christmas and I'll be back next year.

Sandra x

Sunday 12 December 2021

Beautiful Trees

 Hello, I'm sharing some more of my cards from the November show on the Craft Store for Chocolate Baroque.

My first card uses Trees a Crowd. I started with a 18cm piece of card and using a stencil I blended Distress Oxides to create my background scene and moon. I spritzed the background with some water and blotted it to give me a snowy effect. I added some sparkle to the moon, but unfortunately it doesn't show on the photo. I then stamped the main bare tree stamp 3 times at different heights. I stamped out a sentiment and mat and layered my pieces onto a 20cm card base,


For my next card I used a roller to apply Versafine Clair ink to my Inky Plate. I cut a strip of card that was as wide as my card base, but narrower and pulled the print. I then used a scrap of copy paper to make a hill and applied ink with a blending brush. I stamped the trees in Archival ink and adhered to my card base. I added the sentiment which was stamped onto a piece of card with a torn edge.


My next card uses the Harmony TreeSmall Graph Paper and Artist Trading Heart stamp sets.

I started by stamping the heart onto a piece of card and masking off the outside. I blended Distress Inks to make my background and then stamped the tree. I used colouring pencils for the tree. I removed the mask and added the chain  as a hanger and added a shadow on the edge of the heart. I finished by adding the sentiment and layering onto a 15cm card base.


My last card today uses the Remembrance Tree stamp set. I used a small piece of watercolour card stock and sprinkled with Brushos which I then sprayed with water. Amazes me every time! Once it was dry I stamped the tree in the lower part and added the words from Remembrance Tree and Harmony Tree.  


Thanks for looking

Sandra x

Friday 3 December 2021

Hearts and Flowers

Hello, I'm sharing some of my cards made for Chocolate Baroque November show on The Craft Store.


My first card uses the beautiful Magnolia stamp from Happy Flower's Day. I stamped the magnolia in Memento ink onto smooth white cardstock and coloured with alcohol markers. I added a sentiment from the same set and some splatters from Numerology


My next card uses the Artist Trading Heart stamp set.  I stamped the heart with archival ink and carefully cut it out. I then stamped the butterfly from Happy Flower's Day into the heart and coloured with pencils. I blended some Distress Ink around the edges of the heart, going lighter towards the centre. I made a few light pencil marks on the card base where the heart would be placed and used the small leafy stamps from Filigree Trading Hearts to create a border around the heart. I added the number stamp and sentiment and then adhered the heart to the card with foam pads.

My next card uses A Heart Full of Love stamp set. I stamped this pretty image in Memento Ink and coloured with alcohol markers. I added a sentiment from Artist Trading Heart as I thought it very apt.


My last card to share today. I stamped this corner stamp from A Heart Full of Love using my stamping platform and Archival Ink. I then coloured with water colour pencils. I stamped the sentiment onto a die cut and mat and layered all pieces onto a 8x8 card base.

Thanks for looking

Sandra x

Saturday 27 November 2021

Pretty Grungy

 Hello I'm sharing some cards from Chocolate Baroque's October show on The Craft Store.

These feature Floral Grunge, a stamp that is great for different colouring techniques.

For my first card I stamped the flower onto Kraft paper and embossed in white powder. I coloured the flower using the Shimmer paints that Lesley had recently. This colour is an iridescent purple/blue....gorgeous! I added a sentiment from Pretty Poppies.

For my next card I stamped onto smooth cardstock with Memento ink and used my alcohol markers to colour. I added a layer of leafy paper to a 8x8 card, put a narrow band of card across the centre with a  sentiment from Pretty Poppies and then added my flower, raised on foam pads.

Thanks for looking

Sandra x

Sunday 14 November 2021

Numero Uno

 Hello, I'm sharing some more cards made for Chocolate Baroque's October show on The Craft Store.

These cards use the Numerology stamp set, a really useful set for main images and backgrounds.

For my first card I made an inky background with Distress Inks and water. When it was dry I stamped over the background using the 2 larger number stamps with Archival Ink. I realised that I had picked up an old ink pad which was a bit dry, but I carried on and quite liked the distressed look! I stamped  and embossed the fern from Wild Meadow as a focal point and added the Numero Uno onto a piece of card to finish. I layered onto some black card and then onto a 7x5 card.


For my second card I made an inky background again and cut out a tag shape. I  stamped the numbers randomly over the background and then stamped some splatters. I added the man with his umbrella from Eccentric Edwardian stamp set.  I then layered the tag onto some black card and onto a DL card. I added a sentiment from  Punky Expressions.


Thanks for looking
Sandra x

Wednesday 3 November 2021

Let's Face It

 Hello

I'm sharing some of my cards from the Chocolate Baroque October show on The Craft Store. These cards show different colouring techniques for the Beauty is in the Eyes stamp set.

For my first card I stamped the image onto some smooth card stock with Memento ink and then used my alcohol markers to colour. I love the soft pastel colours with the pop of red on her lips and nails. I finished with a sentiment and layered onto a DL sized card.


My next card uses some of Chocolate Baroque's Drawing Cartridge, a lovely paper that can take quite a lot of water. I stamped the image in archival ink I then added water to the bubbles with a brush. Whilst the bubbles were still wet I added small amounts of watercolour ink and let the colours run into each other. When it wad dry I added a sentiment and layered onto black card.


For my last card I stamped in brown Archival ink and coloured with  the Shimmer paints that I managed to get from the September show. It's a shame you can't see the sparkle!


Thanks for looking

Sandra x

Saturday 23 October 2021

Floral Blueprints

 Hello, I am sharing  some more of my Chocolate Baroque Blueprint cards from the September show on The Craft Store.

The stamps that I am using are from Echinacea Blueprint and Lupin Blueprint.

On my first card I made a background using Distress Inks which I then sprinkled with water and blotted to lift the ink. I then stamped around the edges with some of the smaller stamps to create a border. I stamped the main image onto some card, again I used Distress Inks to make a background and I coloured the flowers with water colour pens.  I used oval shaped dies to cut out the Echinacea image and layered onto black.


My next card is very simple. I had a small piece of script paper which I layered onto some black card.
I stamped the smaller echinacea flower onto some cream card and coloured with a silver sparkly pen. I added a piece of ribbon around the lower part of the card and mat and layered this onto some black card and then onto the script layer.


My last card uses the Lupin Blueprint set. I made a background by using Versafine Clair on the Inky Plate. I then used one of the stamps to frame the edge of the card. I used my stamping platform to stamp the main image of the lupin and lightbulb, coloured with water colour pens and then stamped the image again to make it look nice and clear.


Thanks for looking
Sandra x

Tuesday 12 October 2021

One Step at a Time


Hello, I am sharing some more of my Chocolate Baroque cards from the September show on The Craft Store.

The stamps I am using are from Chrysanthemum Blueprints.

For my first card I used a piece of card which I put a rough coat of gesso over. Once this was dry I blended some Distress Ink over the top. I stamped this lovely main image of the staircase and chrysanthemum and coloured the staircase and leaves with Distress Markers. I stamped the image again onto some card, coloured the flowers and fussy cut them out and layered over the top. I distressed and blended some ink around the edges of the card.


For my next card I used my cutting machine to make a circle card. I then used my 6” round Gelli plate to make a background with Distress Inks and stamping the Fibonacci circle onto the plate and taking the print. Once it was dry, I stamped  over the background in black.  I finished by adding the sentiment and blending around the edges.


Thanks for looking

Sandra x

Sunday 3 October 2021

Spires in the Sky


Hello, I am sharing some more of my Chocolate Baroque cards from the September show on The Craft Store.

The stamps I am using are from Allium Blueprints.

For my first card I have used my stamping platform and repeatedly stamped the Spire in black archival ink by rotating the card stock 4 times, I repositioned the stamp between these points and stamped again.  I then added the sentiment on some die cut layers. I added some mat and layers and fixed to a 8x8" card base.


My next card is using the Spire and Allium. First I added a little colour to the background with some Distress Inks. I then stamped the image in black archival ink and coloured with shades of purple and green watercolour pens. I added a little sparkle to the flowers with some Stickles. I used a couple of the worker stamps to complete my card. I mat and layered onto a DL card base.

Thanks for looking
Sandra

Friday 24 September 2021

Sacred Moth

 Hello, I am sharing some more of my Chocolate Baroque samples made for the August show on The Craft Store.

These are using the beautiful new stamps from Fiona Randall called Sacred

For this card I made a background using alcohol inks in shades of blue, purple and gold. I then stamped the words and geometric stamps and embossed in gold. I stamped the butterfly onto acetate and embossed with Verdigris powder, fussy cut it out and used the alcohol inks to colour on the back.


Next I have a wall hanging. 
I covered a piece of grey board in papers and stamped the geometric elements in VersaMark. I have then brushed mica powder over. This gives a lovely, subtle shine to the stamped images. 
I then made my layers for the centre. 
First, I have a black mat of card. On this I have a piece of corrugated card which I have brushed with gesso. I then had a scrap of muslin which I have stained with Distress Ink. I stamped the moth and embossed in white. I then fussy cut this out. I used distress ink on a small wooden frame, I cut a piece of card to fit behind the frame and stamped and embossed one of the geometric stamps in gold. I assembled all the pieces together and added the word stamp. I made two holes at the top and added some string.

 
Thanks for looking
Sandra x

Sunday 12 September 2021

Sacred

 Hello I'm sharing some more of my Chocolate Baroque samples from the August show on The Craft Store. 


These feature the fabulous new stamps from Fiona Randall called Sacred.

On my first card I have made a background using Brushos using two shades of blue. I have then used two of the geometric stamps in the background using archival ink. Once it was dry I used VersaMark to stamp the words, the moth and the dragonfly. I then embossed in white embossing powder. I used a Distress Ink to blend around the edges.


For my next card I used Kraft card as the base, stamped one of the geometric stamps off to one side. I then coloured with pencils and used a blending solution to soften  the colours. I used the word stamp Sacred to stamp repeatedly down the opposite edge.


Although I have used the same stamps on this card, I think it has a completely different look. I have used black card as a base and a Verdigris embossing powder. 

 Thanks for looking,

Sandra x


Friday 3 September 2021

Christmas Wishes

  Hello

I am sharing some of my Chocolate Baroque samples made for the recent shows on The Craft Store.

The stamps I have used are Holly Script, Poinsettia ScriptMistletoe Script and Christmas Rose Script. These stamps are all available individually and as a multi buy.


I thought a set of these cards would make a lovely gift so I have made them all in the same way - stamped in archival and coloured with watercolour pencils. I them mat and layered onto some toning card. I finished with a few sequins, but by the time they to Lesley most had fallen off! Oops, must get some stronger glue!


Mistletoe Script

Poinsettia Script

Holly Script

Christmas Rose Script

My last card today is an Accordion Card which uses the smaller "worker" stamps. The beauty of this style of card is that you can make it with as many panels as you want.


Thanks for looking

Sandra x

Tuesday 24 August 2021

Bee Friendly

 Hello

I am sharing some more of my Chocolate Baroque cards from the recent shows on The Craft Store. These are made using the lovely Honey Bee stamp set.

For my first card, using archival ink, I stamped one of the Foxgloves, masked it with masking tissue and then stamped the second one. I then stamped the Bees and the sentiment also in archival ink, I then used watercolour pencils to colour in and some Stickles to finish the Bees wings.


My next card uses the Beehive from the set. I stamped in Archival ink and coloured with watercolour markers.  The sentiment is from Summer Poppies.

My last card from this set uses the single flower and the honeycomb which I have coloured with Distress Inks. I've also used a honeycomb stencil in the background using Distress Ink (Wild Honey of course!).

My last piece from the show is a board using the Polygon Poppies. I used Distress Oxide spray for the background and used a flourish stencil with Oxide ink pad. I then stamped the grass heads from Walk Tall in archival. I stamped the main poppy image to one side and coloured with watercolour pencils. I used the numeric stamp to create a grungy edge and the polygons, words and numbers to give some interest to the other spaces.

Thanks for looking

Sandra xx


Thursday 12 August 2021

Moonlight

Hello I'm sharing some more of my cards I made for Chocolate Baroque for the July show on The Craft Store.


My first cards use the Majestic Crane stamp set.

First I stamped and embossed the Crane image in silver onto black card.  I then mixed some blue mica powders with a little water to make a "paint" and used this to colour the crane, moon, reeds and water. I finished with one of the sentiments from the set and layered onto some silver mirror card.


For my second card I used watercolour pencils to colour. I also used the tops of the grasses from the next set of stamps to frame the crane.


My next card uses the Walk Tall stamp set. A lovely mix of grasses, berry stems and sentiments.
For this card I stamped the Berry stems in VersaMark and embossed in white over a Distress Oxide on photo paper background.


I have a quick tutorial on how to do the Oxide on Photo Paper background.

First choose 3 or 4 Distress Oxides. I used Antique Linen, Speckled Egg, Peeled Paint and Dusty Concorde.


Taking one of the colours, press it onto a craft mat and spritz with water.


Dip your piece of photo paper in and dry, repeat a couple of time.
Note - try different photo papers, some work better than others. 
I am using Wilkinson's  A4 Glossy Premium Photo paper.


Repeat with the other colours one at a time.


At this stage it looks quite chalky due to the oxidisation. 
So get a damp piece of paper towel and wipe away the chalky finish to reveal the bright colours below. 
(Picture shows the different halves.)

Finished piece, because each individual layer was dried the colours seem to float over each other. 

Just a couple more notes - Distress Inks do not work with this technique, it has to be Oxides. Glossy card does not work either, it has to be photo paper. 

Thanks for looking

Sandra x